
Preparation and Backup
Migrating your website to a new web hosting service requires meticulous preparation to ensure a smooth transition. The first and most crucial step is to back up all your website data, including files, databases, and email accounts. A comprehensive backup ensures that no data is lost during the migration process, providing a safety net in case of any unexpected issues.
There are several methods to create backups. One common approach is using control panel tools like cPanel or Plesk, which offer built-in options for generating full website backups. These control panels typically provide user-friendly interfaces to download your website’s files and databases with just a few clicks. Alternatively, you can use FTP clients such as FileZilla to manually download all your website files to your local computer. This method offers more control over the backup process but requires a basic understanding of your website’s file structure.
Third-party backup services are another viable option, especially for those who prefer automation. These services offer scheduled backups, cloud storage, and easy restoration options. It’s essential to choose a reliable backup service that supports your website’s specific needs. Whichever method you choose, ensure that you verify the integrity of your backups before proceeding with the migration.
Alongside creating backups, gathering all necessary information is vital. Ensure you have login credentials for both your old and new hosting accounts. Access to these accounts is essential for transferring data and configuring settings. Additionally, confirm that your domain name is unlocked and ready for transfer. Domain locking is a security feature that prevents unauthorized transfers, and unlocking it is a prerequisite for a smooth migration.
Finally, inform your users about potential downtime. Communication is key to maintaining user trust and minimizing frustration. Plan the migration during off-peak hours to reduce the impact on your website’s traffic. By following these preparatory steps, you can ensure a seamless transition to your new web hosting service, minimizing disruption and maintaining the integrity of your website data.
Migration Process and Testing
Migrating your website to a new hosting server involves several critical steps to ensure a seamless transition. Begin by uploading your website files to the new hosting server. This can be done using various methods such as FTP/SFTP, the hosting provider’s file manager, or a specialized migration tool designed to streamline the process. Each method has its own set of instructions, typically provided by your new hosting provider.
Next, you will need to import your databases. Tools like phpMyAdmin or other database management systems can simplify this task. Export your database from the old hosting server, then import it to the new server using the available tools. Ensure that you carefully follow the instructions to avoid data loss or corruption during the transfer.
Once your files and databases are successfully uploaded, update your website’s configuration files. These updates should reflect the new server settings, such as database connection details and file paths. Double-check these configurations to prevent any connectivity issues that may arise due to mismatched settings.
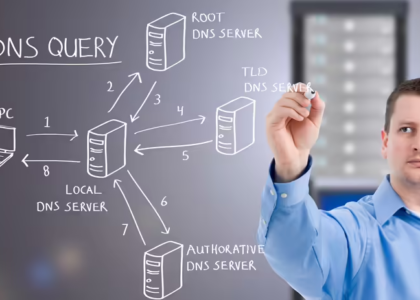
After configuring your files, it’s time to update your domain’s DNS settings to point to the new hosting server. This change can take up to 48 hours to propagate fully, so plan accordingly. During this period, some visitors might still be directed to your old hosting server. Therefore, it’s crucial to minimize changes to your website during this transitional phase.
Testing your website on the new hosting environment before making it live is paramount. Check for functionality, broken links, and any inconsistencies that may have occurred during the migration. Utilize browser developer tools and online services to test various aspects of your site, ensuring that everything works as expected.
If any issues arise during testing, promptly address them. Common problems might include missing files, incorrect database connections, or minor configuration errors. Finally, perform a comprehensive backup on the new host to safeguard your data against any unforeseen issues. Properly executing these steps will facilitate a smooth and successful website migration.